Set Up an Automatic Reply for a Change of Address in Outlook
Notes:
These instructions apply only to employees! These instructions apply to the Outlook app; changes may occur when using the web interface at https://mailex.uni-bamberg.de/.
If your email address has changed—for example, due to a name change—you can continue to receive messages sent to your old address during a transition period.
You should send an automatic reply to senders who have sent a message to the old address to inform them of the new address. After a reasonable period of time has elapsed, you should have the old address deleted so that senders will then only receive a “mail undeliverable” message.
Set Up a New Rule
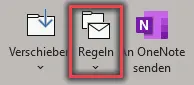
Figure 1: Create a Rule
On the Start ribbon, click the Rules icon, and then click Manage Rules and Alerts. Next, on the Mail Rules tab, click New Rule and select Apply this rule to messages I receive. Then click Next.
Figure 1 shows the “Rules” icon.
Set up a condition
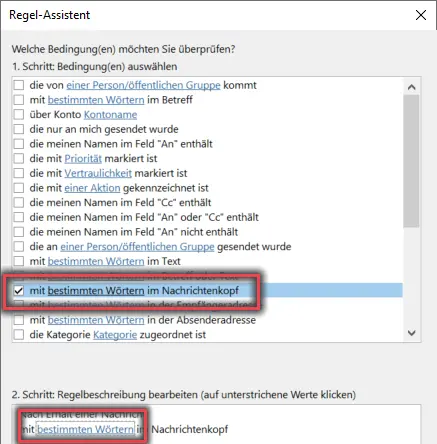
Figure 2: Control Conditions
In the Rule Wizard, under Step 1: Select Condition(s), select Contains specific words in the message header as the condition. Now, in the Step 2: Edit Rule Description window, click the specific words link.
In Figure 2, the points described above are highlighted with markers.
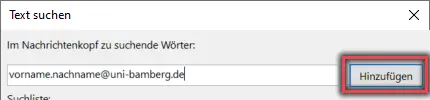
Figure 3: Entering Your Old Email Address
Enter your old email address there, click Add, and confirm by clicking OK. In the previous window, Rule Wizard, click Next.
Figure 3 illustrates the step described above with an example.
Set Up a Promotion
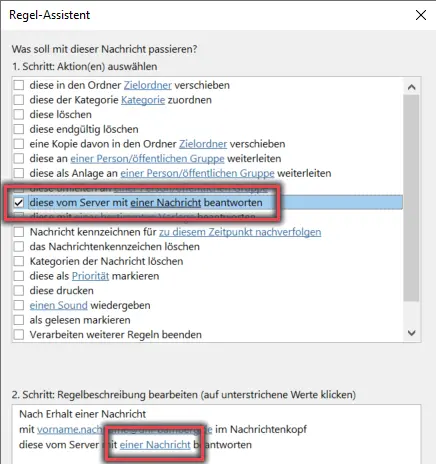
Figure 4: Rule Actions
In the Step 1: Select Action(s) window, select Reply to this from the server with a message as the action. In the Step 2: Edit Rule Description window, click the Message link. In the window that opens, enter your message text. Leave the address fields (To… and Cc…) blank and fill in only the subject line.
In Figure 4, the points described above are highlighted with markers.
Your message can read as follows:
Subject: My new email address: vorname.nachname@uni-bamberg.de
You sent an email to vorname.nachname@uni-bamberg.de (old). Thank you very much; I have received your message and am processing it. Please note that I can now be reached at vorname.nachname@uni-bamberg.de (new). The address vorname.nachname@uni-bamberg.de (old) is only active during a transition period and will be deactivated shortly.
Sincerely,
Now click the Save & Close icon on the ribbon, and then click Nexttwice.
Set the name and finish the rule
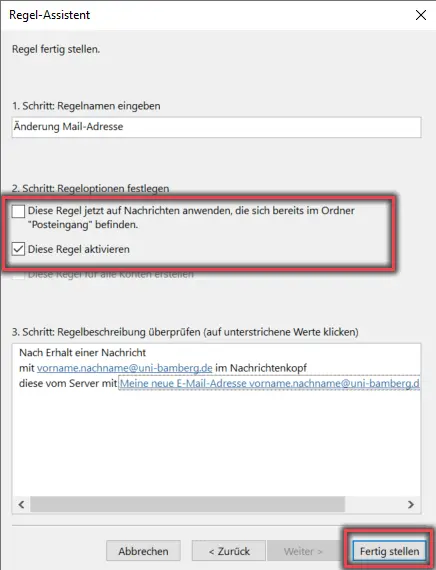
Figure 5: “Finish Rule” View
In the Finish Rule window, enter a name for the rule in the Step 1: Enter Rule Name field—for example, “Autoresponder for Email Address Change.” In the Step 2: Set Rule Options window, deselect the Apply this rule now to messages… checkbox and select the Enable this rule checkbox.
Click Finish, and then click OK in the Rules and Notifications window.
In Figure 5, the points described earlier are highlighted with markers.