These instructions apply to the UCC client for the new phone system.
Even if you are using a Snom phone, you must use the UCC client to complete the following steps.
Basics for Getting Started
If you want to activate your voicemail, set up what are known as call forwarding profiles. You can distinguish between internal and external calls. You can configure settings that always take effect, or that apply only when the person being called
is not logged in on the client or phone
just got off the phone
does not answer the call.
Call forwarding profiles are configured in the UCC Client, regardless of whether you’re making calls using a Snom phone or a softphone (UCC Client)!
If you want to use a custom recorded message for a call forwarding profile, you must first create (record) it. However, the system also provides a default message that you can use in the call forwarding profile. You can either set up just a message (Message) or allow the caller to leave you a message (Voicemail). A call forwarding profile can be scheduled to run at specific times on the Scheduled Call Forwarding page. Examples:
Recurring, for example, if you work only three days a week
This is a one-time option if you cannot be reached on a specific day after a certain time, or if you can be reached only at a different phone number.
These time profiles are set up once and can then be activated or deactivated manually or on a scheduled basis.
Record a Custom Greeting
A Unique Feature of Snom Phones
If you are using a Snom phone, you cannot record directly in the UCC client. Alternatively, you can record an audio file using additional software or the dictation feature on your smartphone. You can then upload this file to the UCC client. Or you can first set up a call forwarding profile with an answering machine and a default greeting:
Call themselves and leave their message on their own answering machine.
Download the greeting from the answering machine list in the UCC client.
Upload the audio file again under Announcements.
Recording in the UCC client
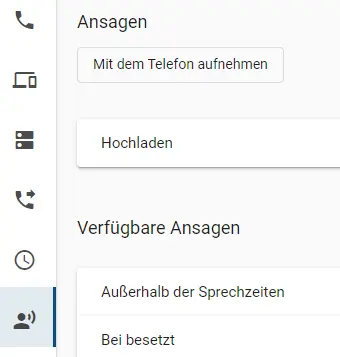
Figure 1: Recording Announcements
Go to the Announcements page by clicking the corresponding icon in the navigation bar on the left.
Click the Record with Phone button to start recording.
Listen to the message on the phone and record your own personalized greeting. End the recording by pressing the # key.
Add a custom description to the announcement to make it easier to find.
Figure 1 illustrates the process described above.
Tip:
If the announcement does not appear under Available Announcements, refresh the list by clicking the arrow icon.
Set Up a Call Forwarding Profile
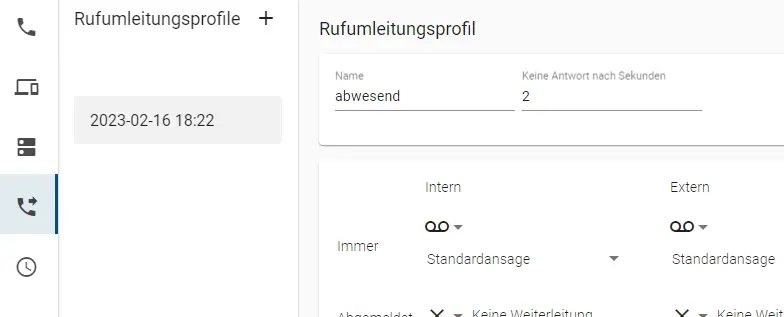
Open the Call Forwarding Profiles page (see Figure 2) by clicking the corresponding icon on the left side of the navigation bar. Click the plus sign at the top next to “Call Forwarding Profiles,” and replace the date with a descriptive name, such as “Away.”
Decide,
when the announcement should be played:
whenever the line is off the hook, when the line is busy, or when no one answers the call
for calls made internally or externally.
whether it should be just an announcement or whether the caller can leave a message (answering machine).
whether it is a standard message or a custom message.
Select the announcement in the appropriate section. Save the settings. To avoid having to delete and reconfigure the call forwarding profile every time, you now need to schedule the call forwarding.
Figure 2: Call Forwarding Profiles
Set Up Time-Based Control
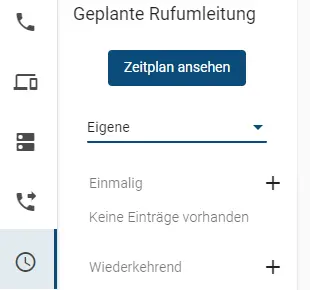
Figure 3: Defining a Schedule
Open the Scheduled Call Forwarding page (see Figure 3) by clicking the corresponding icon on the left side of the navigation bar.
Example:
If you want callers to be notified of your absence starting at 4:30 p.m. each day, click the plus sign to the right of Recurring.
Enter a title, such as “Answering Machine” or “Unreachable.”
Select the call forwarding profile you set up earlier.
Set the days of the week and times when call forwarding should be active (in our example: Monday through Friday starting at 4:30 p.m.).
Save the settings. For Saturday and Sunday, you may need to set up another recurring call forwarding schedule (starting at 12:00 a.m.).
Scheduled call forwarding can be enabled or disabled as needed.
Attention:
Scheduled call forwarding must always be set for a future date.
Email Notification
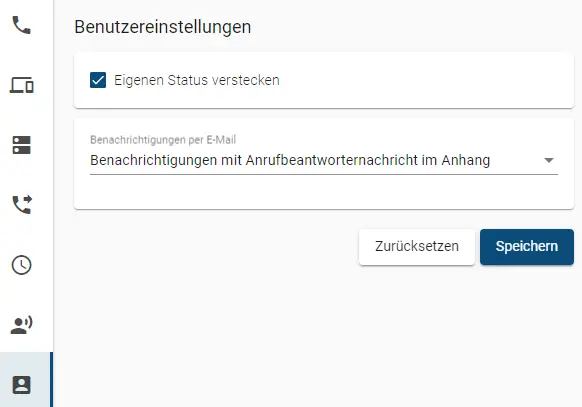
Figure 4: Setting Up Email Notifications
If you have set up an answering machine that allows callers to leave a message, you can have the message sent to you via email. You'll need to set this up once in your user settings.
In the navigation bar on the left, click the User Settings icon.
Under Notifications via email, select the option Notifications with an answering machine message attached.