Set Up a Work Email Account in Apple Mail on macOS
Important Notes:
To set up an email account, you must have a valid user account (BA number).
To set up a task-specific email account, you must already have been granted the necessary access permissions (for example, by the management of your organizational unit), which means you must be a member of the relevant security group.
We simply recommend using the Mail app, as the Notes app often does not work well with this account. Therefore, you should uncheck this box.
Add an email account
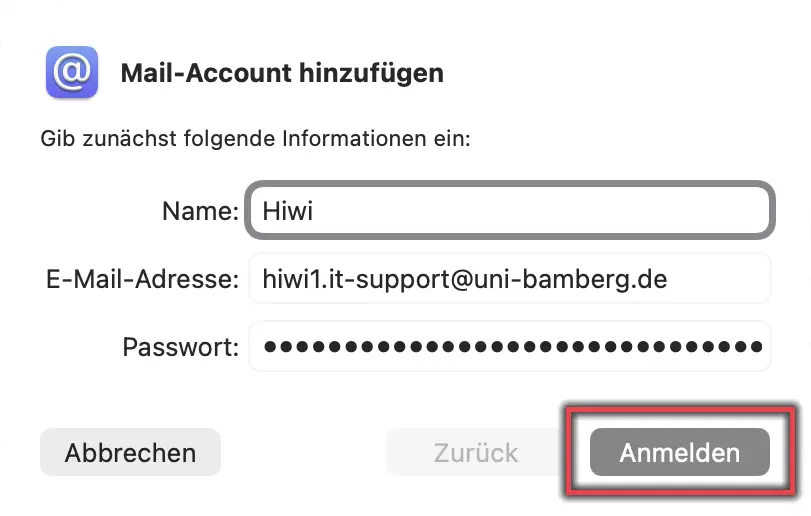
Figure 1: Add a task-specific email account
Launch Apple Mail, and then select Add Account… from the Mail menu.
Select the “Other Mail Account...” option and click “Continue”.
Please fill out the window that has now appeared as follows:
Name: Desired display name for the account
EMail-Adress: The task-specific email address
Password: Email App Password from the IAM Portal
Then click Log In.
Figure 1 shows the input form with a sample email address entered.
Please fill out the window that has now appeared as follows:
EMail-Adress: The task-specific email address
Username: uni-bamberg.de\Your personal BA number followed by -email\The part of the task-related email address that comes before the @ symbol. Example: If the email address is it-support@uni-bamberg.de, then the username should be entered as follows: uni-bamberg.de\baXXXX-email\it-support
Passwortd Email App Password from the IAM-Portal
Account Type: IMAP select
Server for Incoming Emails: mailex.uni-bamberg.de
Outgoing Email Server: mailex.uni-bamberg.de
Then click Log In.
Figure 2 shows the configuration described above.
In the next step, you'll be asked which programs you'd like to use with this account. Finally, click the Done button.
Figure 2: Configuring the Task-Based Email Account
Im letzten Schritt müssen Sie eine Anpassung des Benutzernamens für den E-Mail Ausgangsserver vornehmen. Klicken Sie auf das Menü Mail und gehen Sie über den Punkt Einstellungen auf Accounts. Wählen Sie anschließend das gewünschte Konto aus und passen Sie unter dem Punkt Servereinstellungen den Benutzernamen für den E-Mail-Ausgangsserver (SMTP) an. Geben Sie für den Benutzernamen folgendes ein:
Benutzername: BA-Nummer-email
Beispiel: baxxxx-email
Entfernen Sie anschließend den Haken bei Verbindungseinstellungen automatisch verwalten und passen Sie dann die folgenden Einstellungen an:
Port: 587
TLS/SSL verwenden: Setzen Sie hier einen Haken
Authentifizierung: Passwort
Klicken Sie abschließend auf Sichern!
Abbildung 3 zeigt die zuvor angegebenen Servereinstellungen.
[Translate to English:] Abbildung 3: E-Mail-Konto Servereinstellungen

![[Translate to English:] Ansicht E-Mail-Konto Servereinstellungen](/fileadmin/_processed_/f/3/csm_apple-mail-aufg-konfig_73699f20c9.webp "[Translate to English:] E-Mail-Konto Servereinstellungen")